MOMOX3docs

Get set up

Everything here takes a few minutes, needs no technical skill, and each step has a picture of exactly what you should be looking at. Your keys stay in your browser — MomoX3 never stores them in a database.

1 · Connect AlpacaFree market data — charts go live.~3 minutes 2 · Connect SchwabRecommended for everyone — 100% of US volume in real-time (IEX alone is ~2%).~5 minutes + 24–72 hr approval 3 · Sign inYour account, your devices.~1 minute
SETUP 1

Connect Alpaca — free live data

~3 minutes · free account · no funding required

MomoX3 draws its charts from market data fetched with your own free Alpaca account — real-time prices, with full-market volume on a 16-minute delay. Until you connect it, the app runs on SAMPLE data.

1

Create a free Alpaca account

Go to alpaca.markets and sign up. Choose a regular (live) account — you do not need to deposit any money. Data works on an unfunded account.

Alpaca sign-up page
2

Open your dashboard and find API Keys

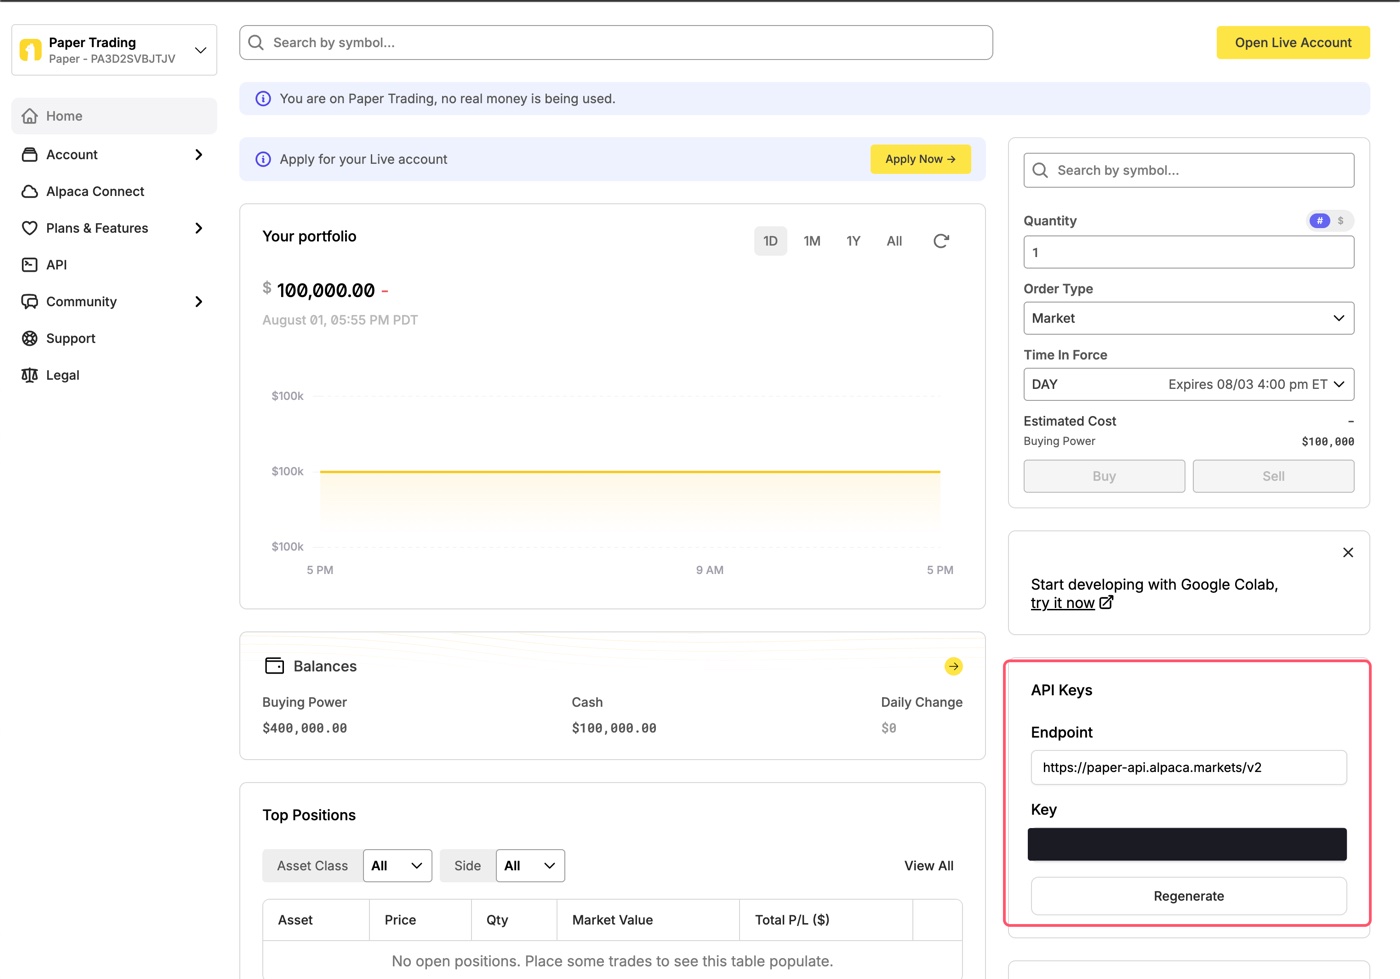
Sign in at app.alpaca.markets. On the home dashboard, look at the right-hand side for the API Keys panel. (If your dashboard says Paper Trading at first, that's fine — the panel is in the same place either way.)

Alpaca dashboard with the API Keys panel highlighted
📱 On your phone? The panel hides below the fold — from the menu tap Home, then scroll down to API Keys. Seven seconds, start to finish:
3

Generate your key pair

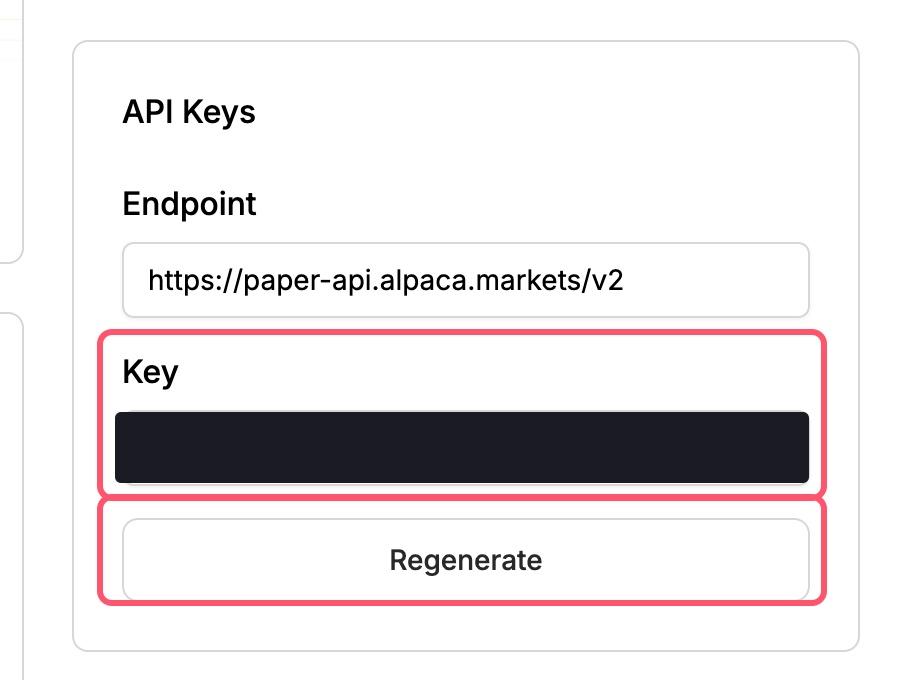
In that panel, click Generate (or Regenerate). Alpaca shows two values: an API Key and a Secret. Copy both right away — the Secret is shown only once.

Alpaca API keys panel with the key and generate button highlighted
4

Paste both into MomoX3

Open app.momox.io and click the key button in the top-right corner of the header (circled below).

MomoX3 header with the key button circled, top right

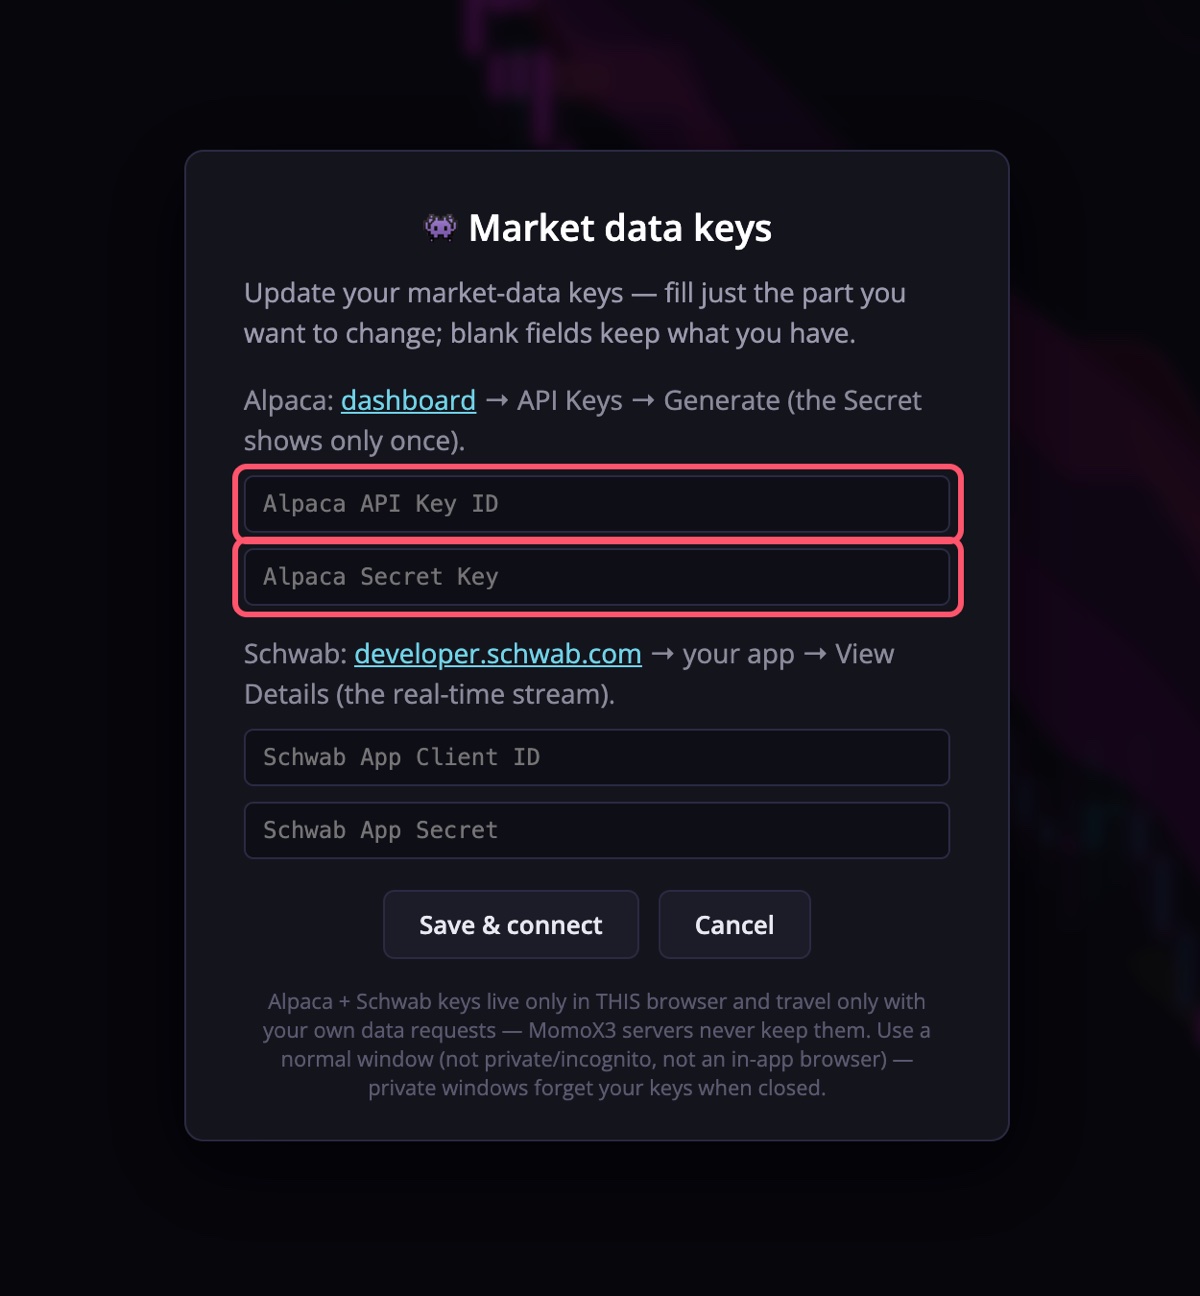
Paste the API Key and the Secret into the two Alpaca fields and press Save & connect.

MomoX3 data keys dialog with the two Alpaca fields highlighted
5

Done — charts go live

The SAMPLE DATA notice disappears and the feed pill in the header turns ● LIVE. That's it — you're on live data.

Is the data free — and what exactly do you get? Yes, free forever. What you see is genuinely real-time — but from the IEX exchange only, about 2% of US volume. What to expect on IEX: pre-market and after-hours it can go quiet for 20–40 minutes at a time (no new candles until the next IEX trade — that's the exchange, not the app); during market hours candles form live but are thinner than the full tape. The full-market consolidated tape (every US exchange, ~98% of volume) arrives 16 minutes behind, and MomoX3 automatically upgrades each bar to full-market data once it's 16+ minutes old. The fix is Schwab: connect Schwab below and you stream 100% of US volume in real-time, free, or add Alpaca's optional Algo Trader Plus plan ($99/mo) — bought from Alpaca on your own account, used automatically, and we never charge you for data.
SETUP 2 · RECOMMENDED FOR EVERYONE

Connect Schwab — real-time streaming

~5 minutes · wait 24–72 hrs for Schwab approval · requires a free Schwab brokerage account

Schwab gives MomoX3 the full market in real-time — 100% of US volume, free. Without it you stream IEX only (~2% of volume: quiet pre-market and after-hours, thin candles in session), so treat this as part of setup, not an extra. The one-time setup is: create a free Schwab developer account, request Trader API access and wait 24–72 hrs for Schwab to approve it, register an "app" there, wait for Schwab to switch it on, then connect inside MomoX3. Follow the pictures — none of this requires being technical.

1

Create a Schwab developer account

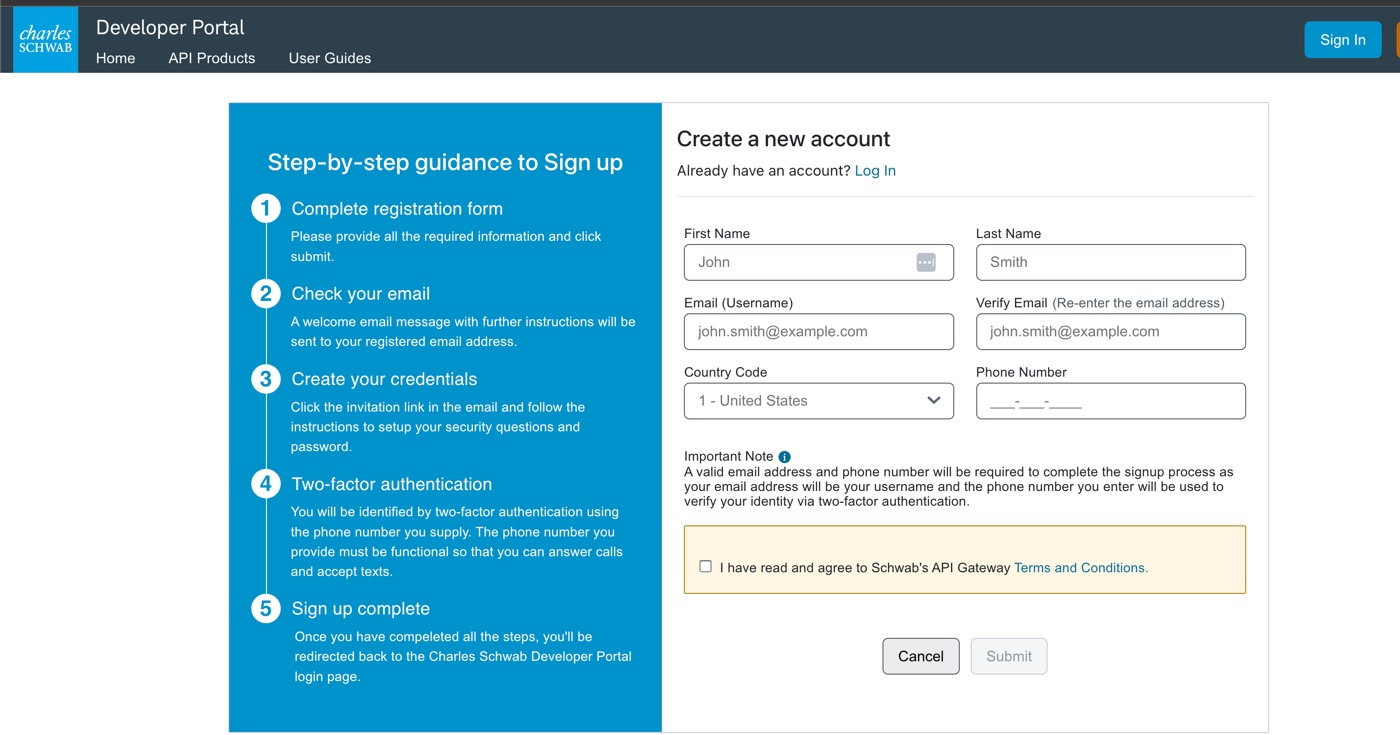
Go to developer.schwab.com/register and create your account. This is a separate login from your normal Schwab brokerage login — you're creating a new (free) developer profile. Schwab verifies your email and phone as part of sign-up.

Schwab developer portal registration form
2

Choose “Individual Developer”

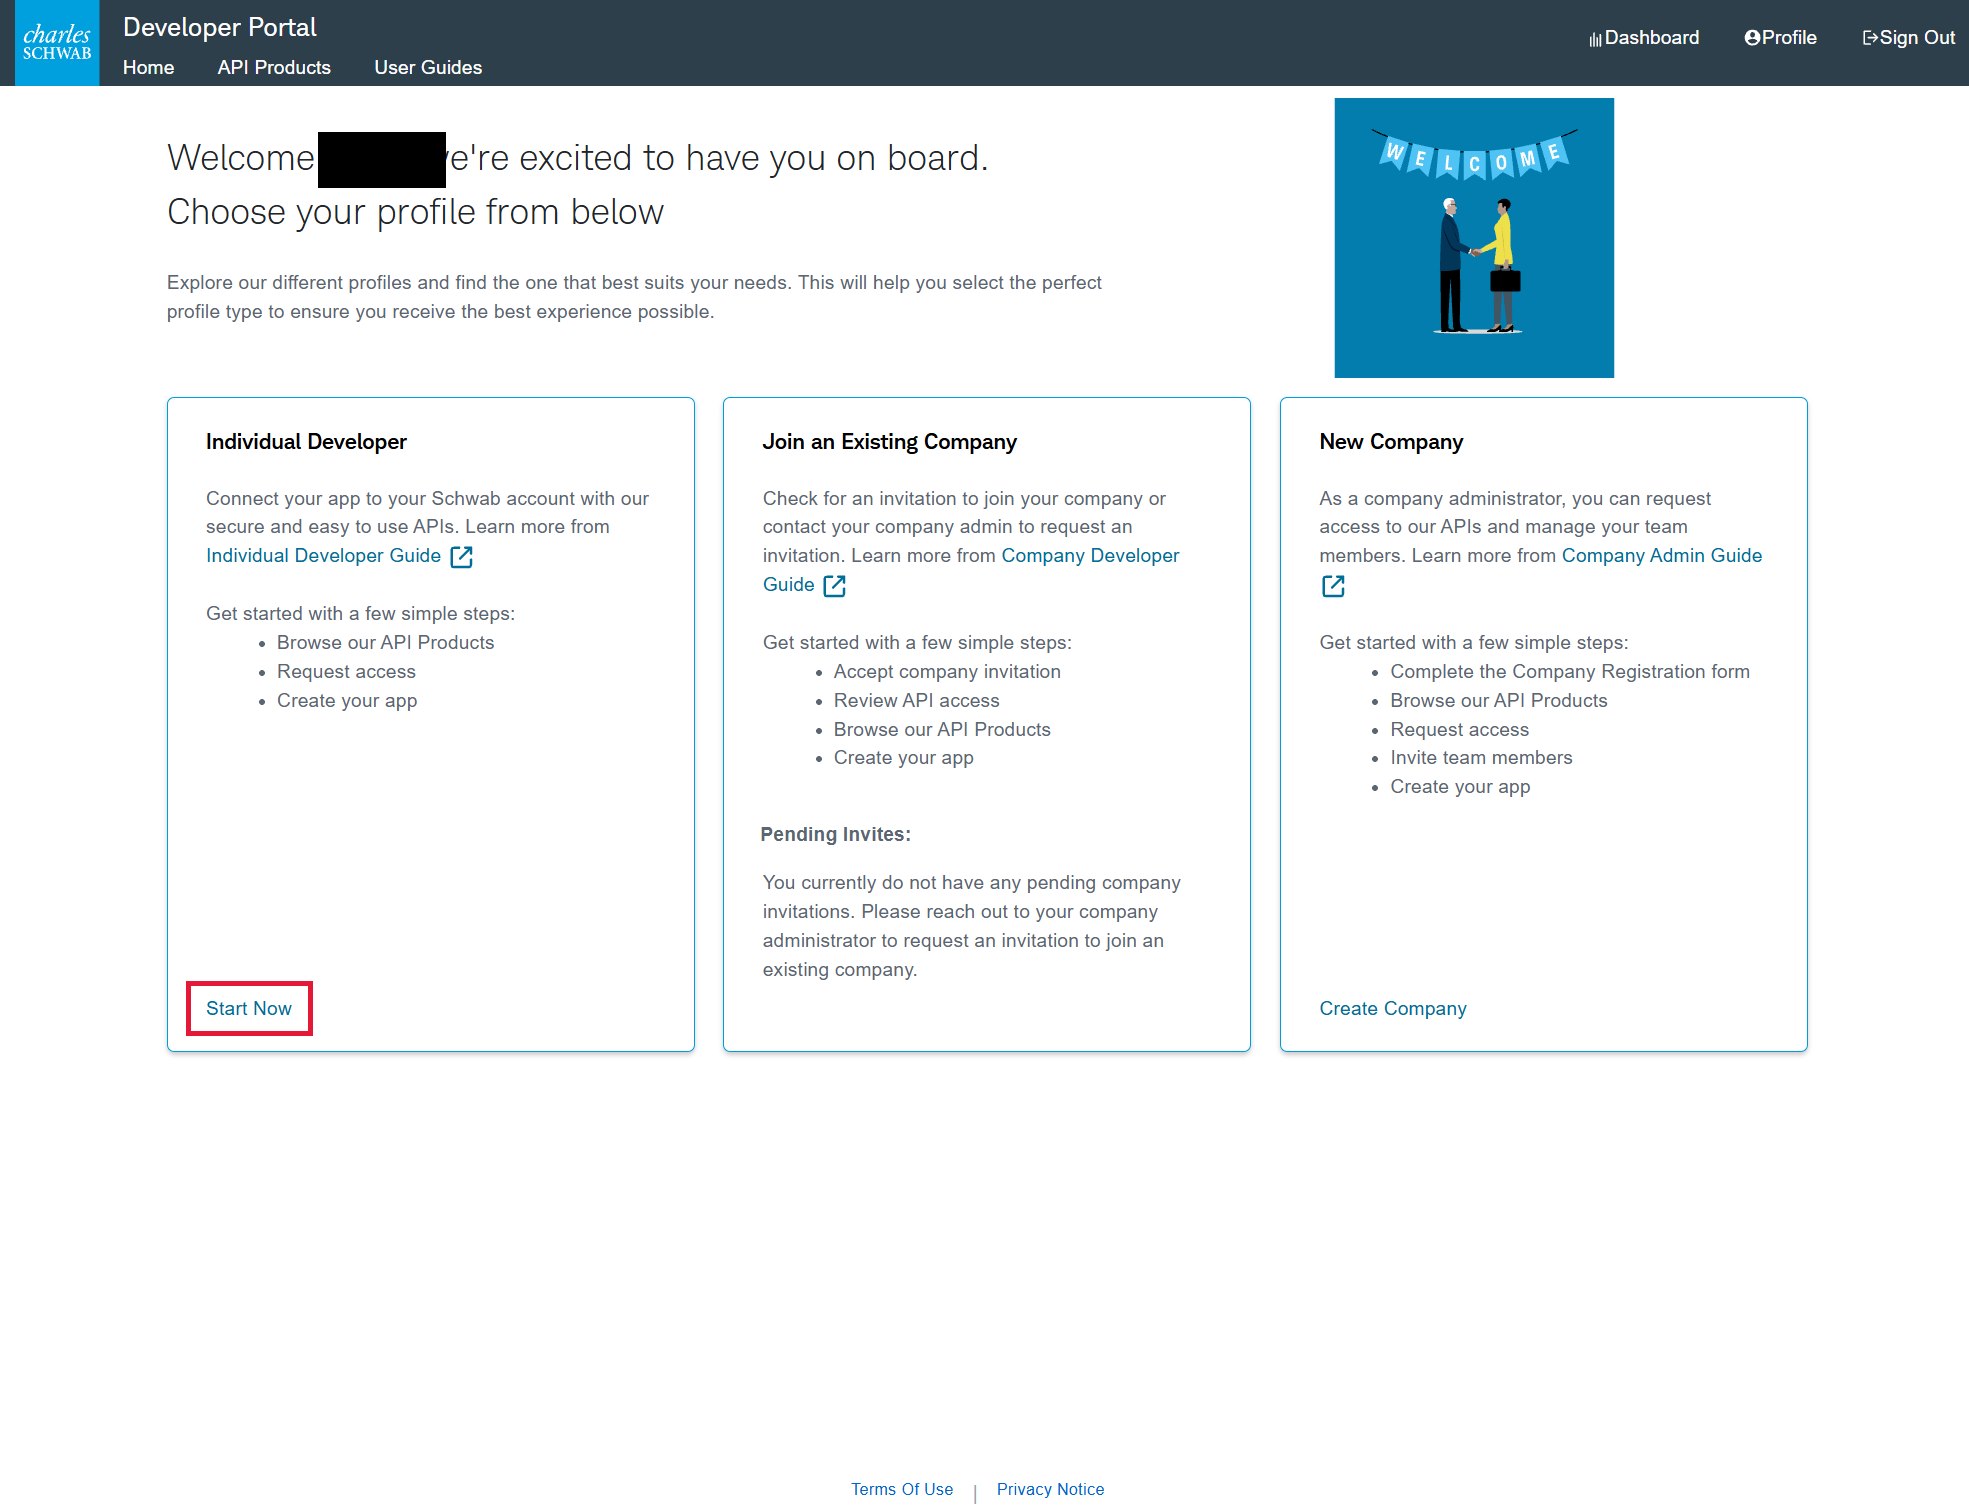
After signing in you'll see three profile cards. Under Individual Developer (the left card), click Start Now.

Schwab developer portal profile choice with Individual Developer's Start Now outlined in red
3

Request access to the Trader API — then WAIT for approval

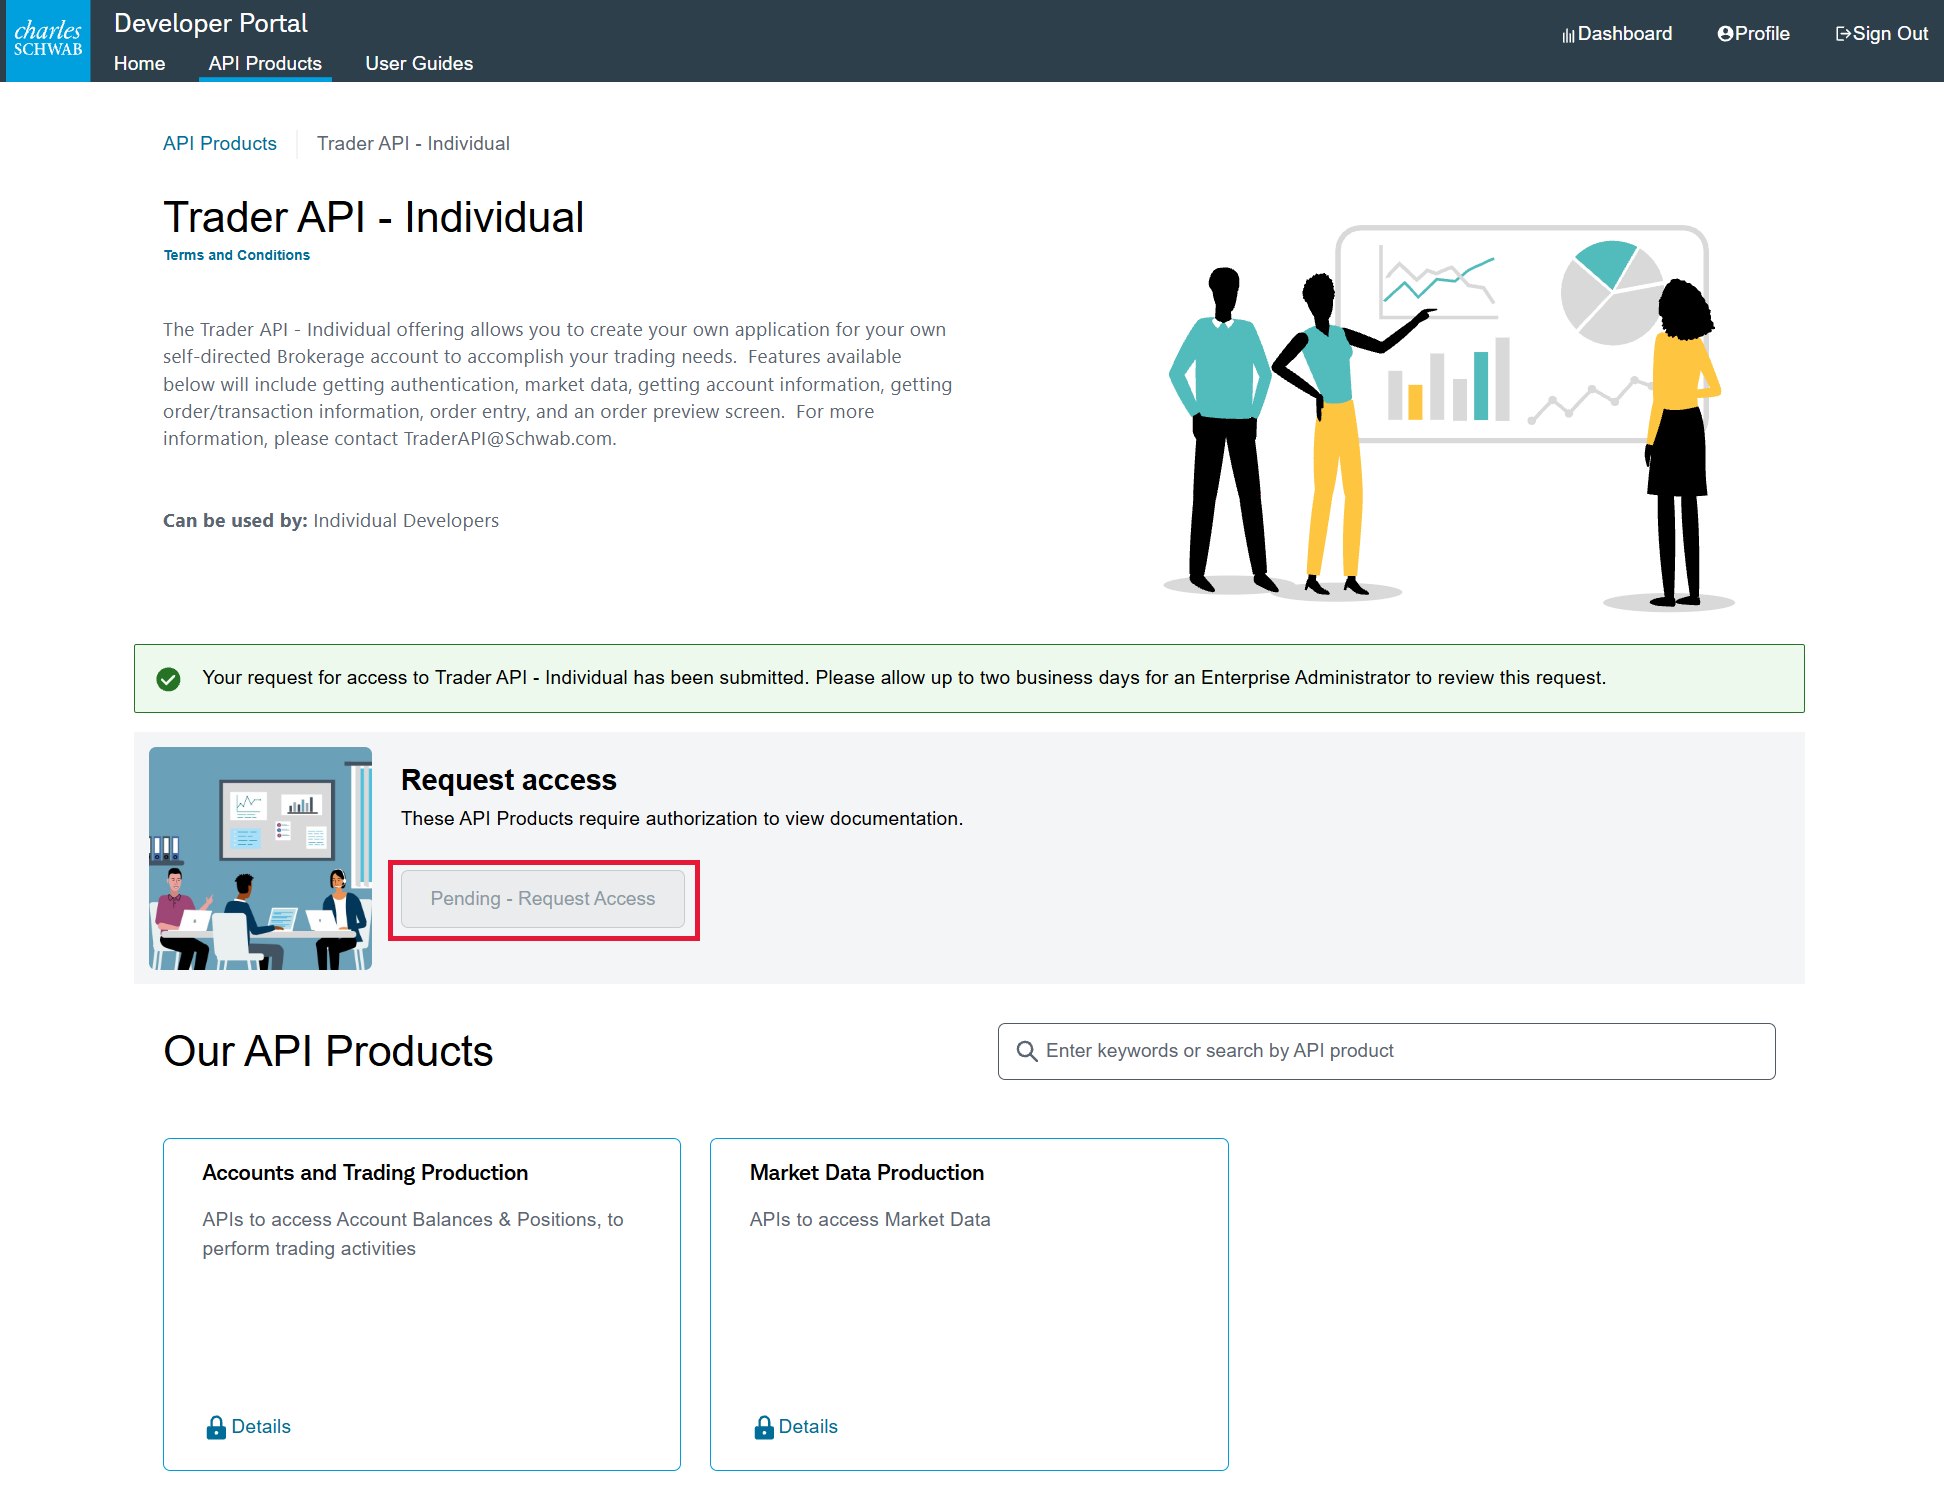
Go to API Products → Trader API - Individual and click Request Access. The button flips to Pending - Request Access and a green bar confirms your request was submitted — that's all you can do for now.

Trader API - Individual page with the Request Access button outlined in red and the submitted confirmation showing
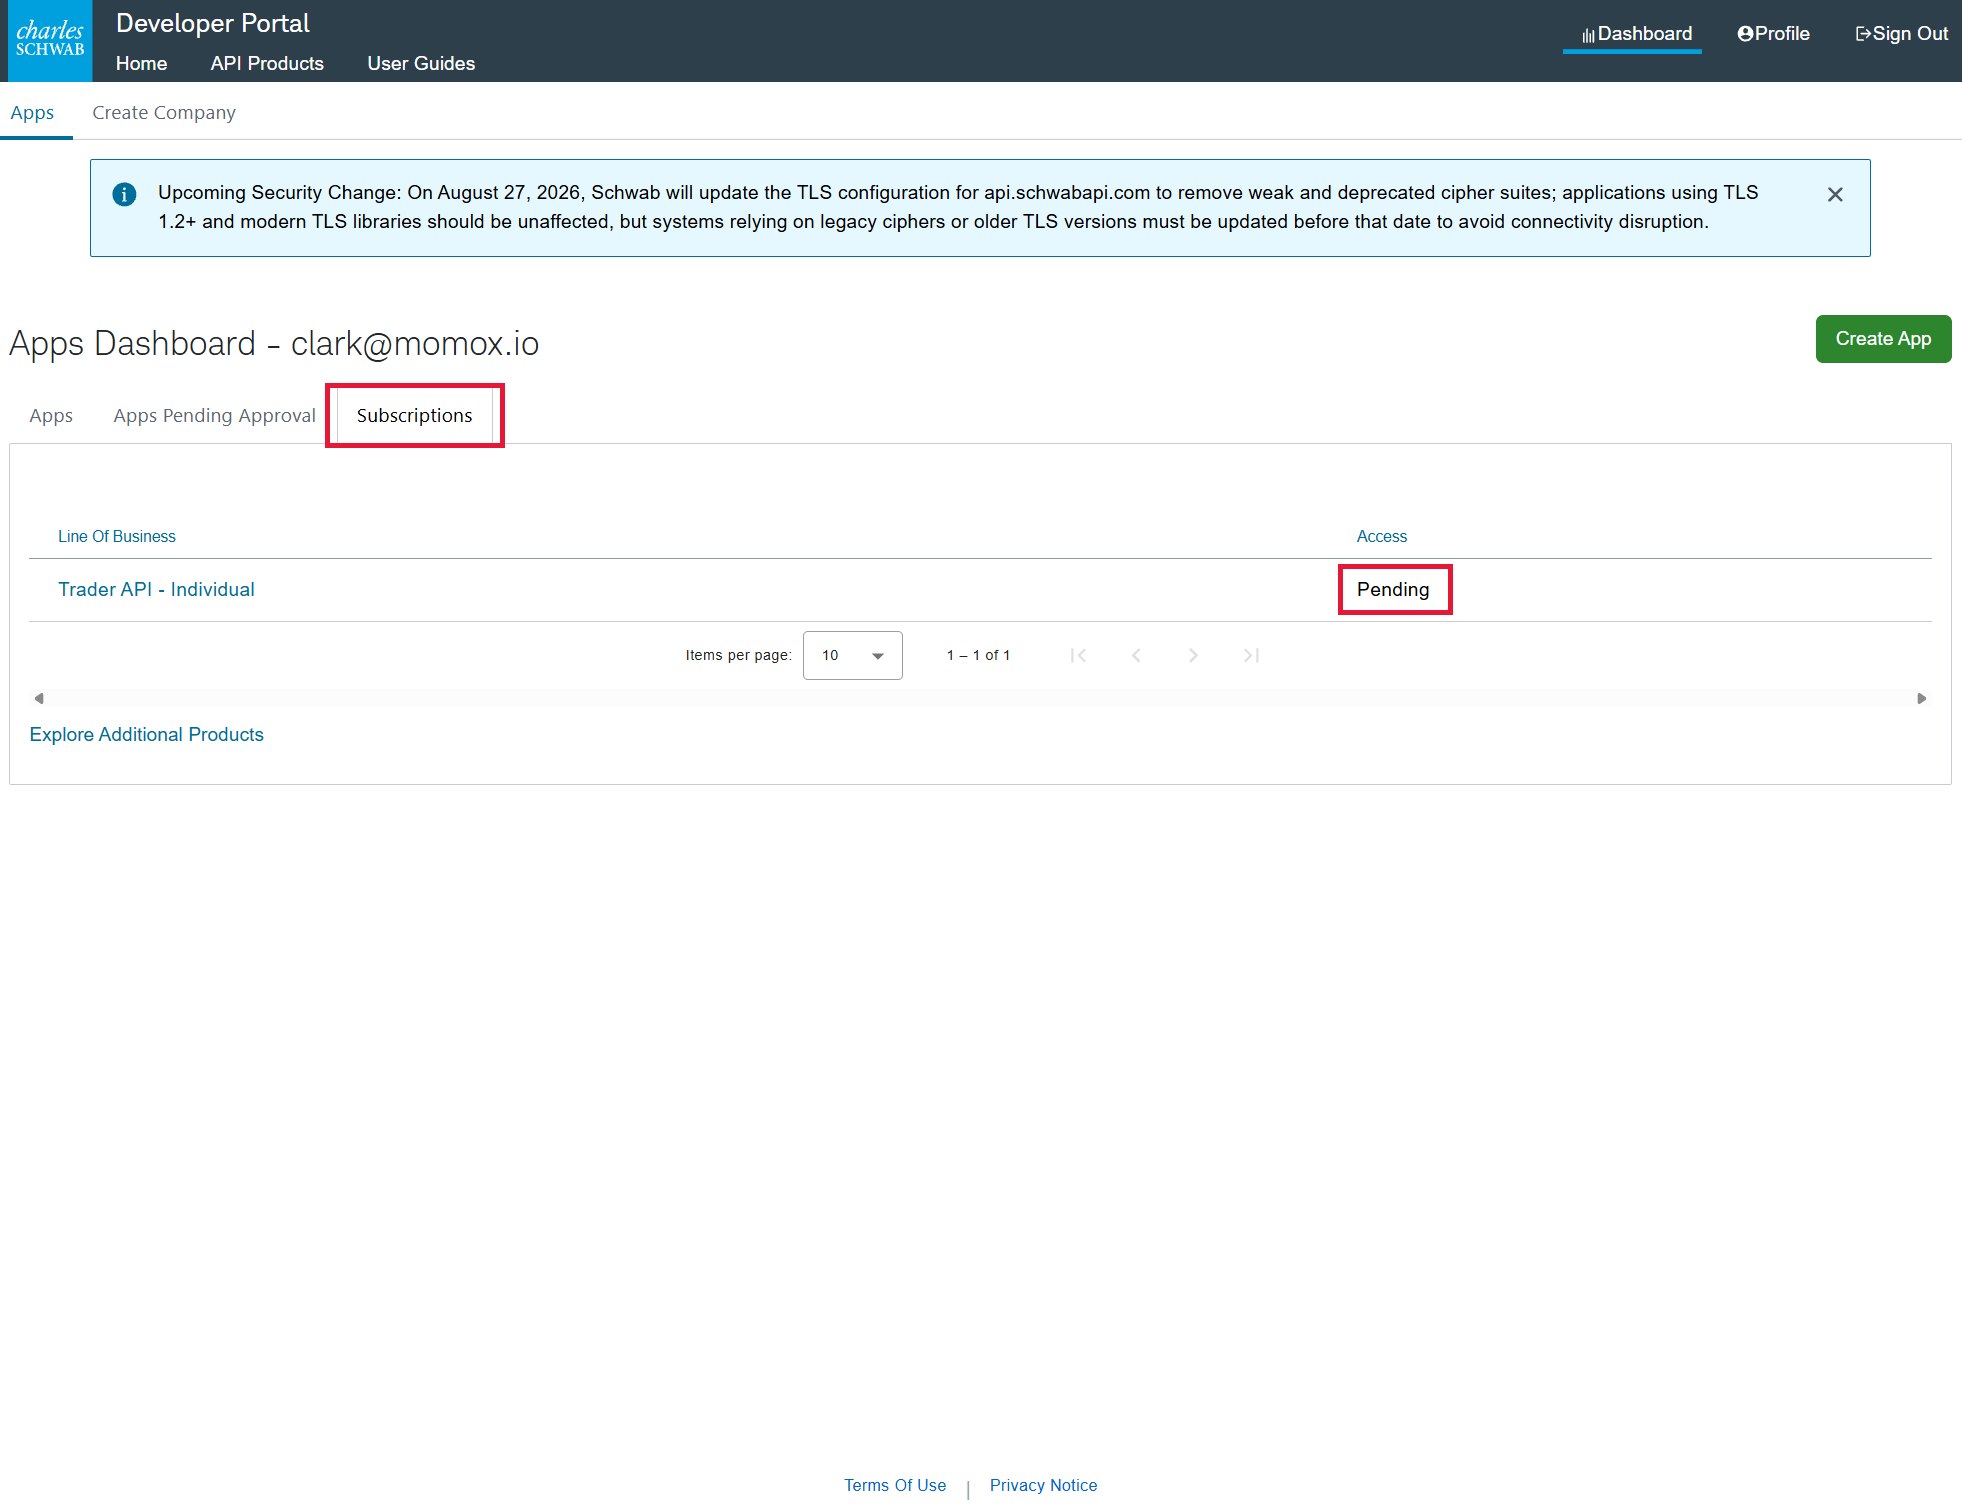
⏳ This is the wait — not the app yet. Schwab reviews access requests by hand, typically 24–72 hours (business days). Until it's approved, your Dashboard → Subscriptions tab shows Pending — and you can't create the app yet. Trying on day one isn't broken; it's just too early. Check back when Subscriptions shows Approved, then continue to the next step.
Apps Dashboard Subscriptions tab showing Trader API - Individual access Pending, outlined in red
📧 The "Welcome to Dev Portal" email is NOT the approval. That email (subject "Create your login credentials") just means your developer account exists — it arrives within the hour and fools almost everyone. The real approval never comes as an email at all: the only truth is the Subscriptions tab at developer.schwab.com/dashboard/apps. No results found there means your access request was never submitted — the wait hasn't even started. Pending means you're in the queue. If you don't see the "Individual Developer" chooser to request from, go straight to the Trader API - Individual product page and click Request Access there.
4

Create an app — four fields matter

Once your Trader API access shows Approved (previous step): Dashboard → Create App. Everything circled in red below matters; the rest you can leave alone.

  • Both API productsAccounts and Trading Production and Market Data Production. Market Data alone is not enough: the live stream won't connect without the Trading product, and the connection will look broken.
  • Order Limit120.
  • App Name — anything, e.g. MomoX3.
  • Callback URL — exactly https://app.momox.io/schwab/callback (recommended — this powers ⚡ 1-click connect: sign-ins finish themselves, no copy/paste ever). The manual alternative https://127.0.0.1 also works but makes every sign-in a copy/paste. Either way: nothing else — no extra slash, no port, not http://.
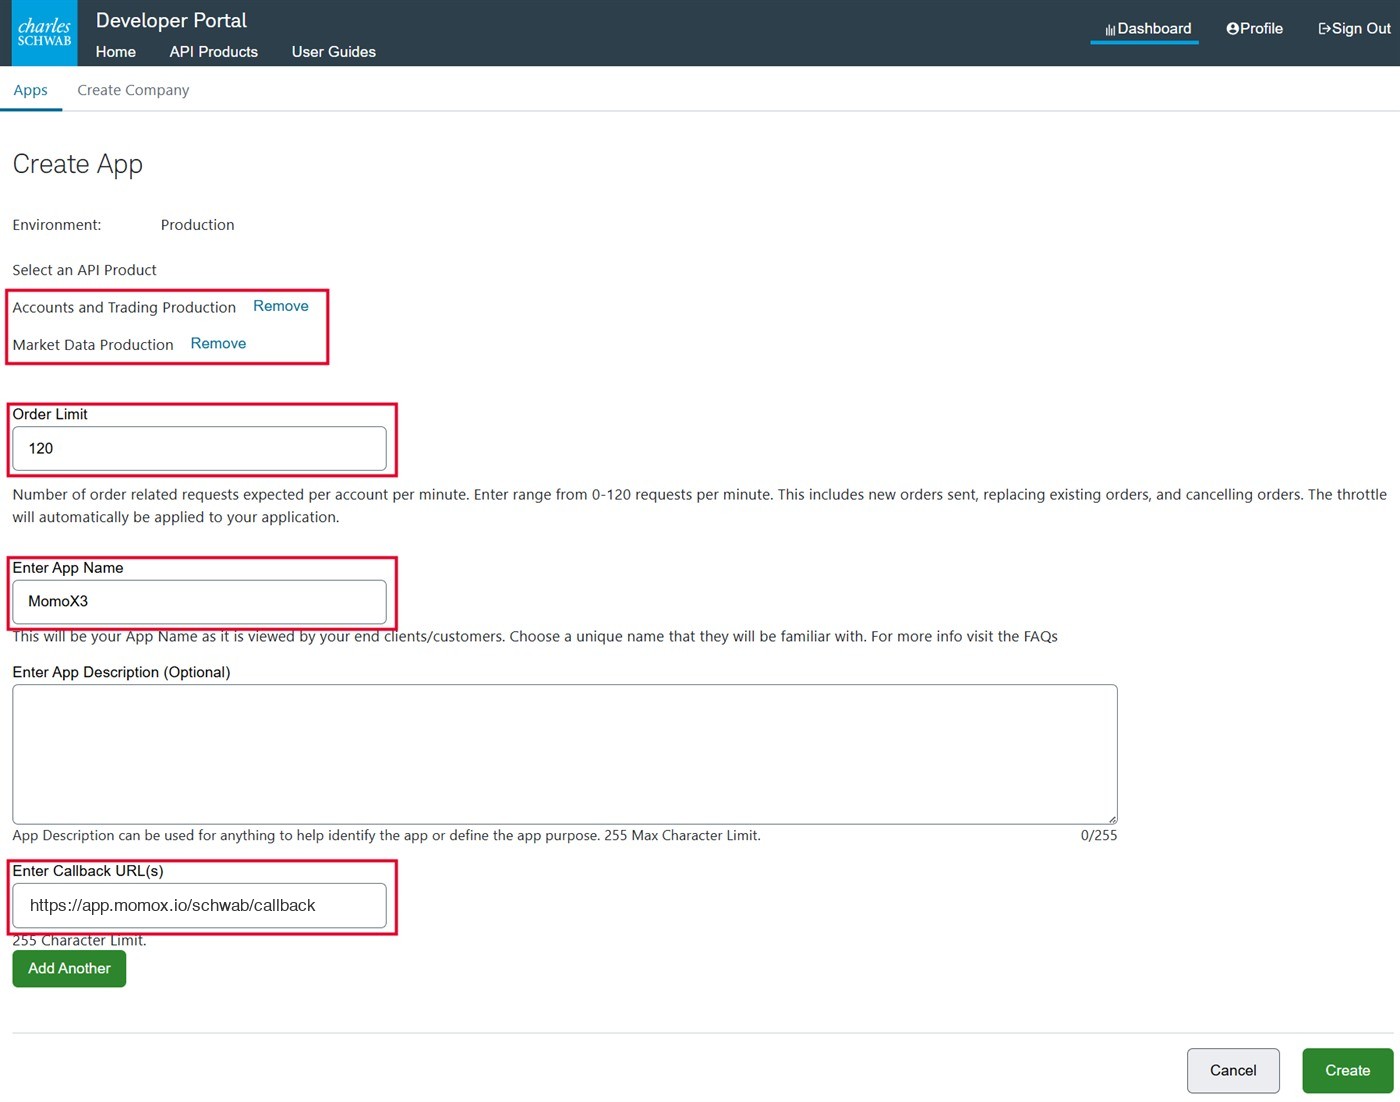
Schwab Create App form with the two API products, order limit, app name and callback URL outlined in red
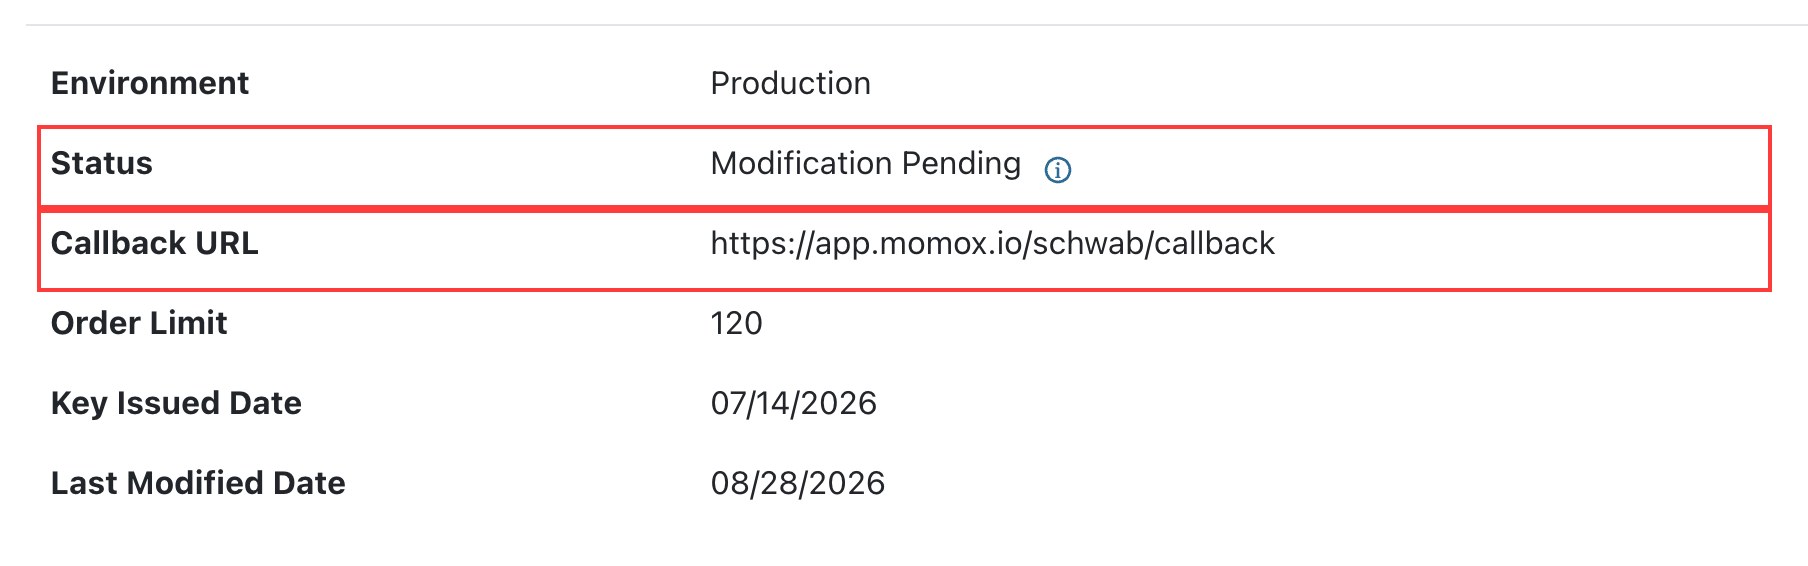
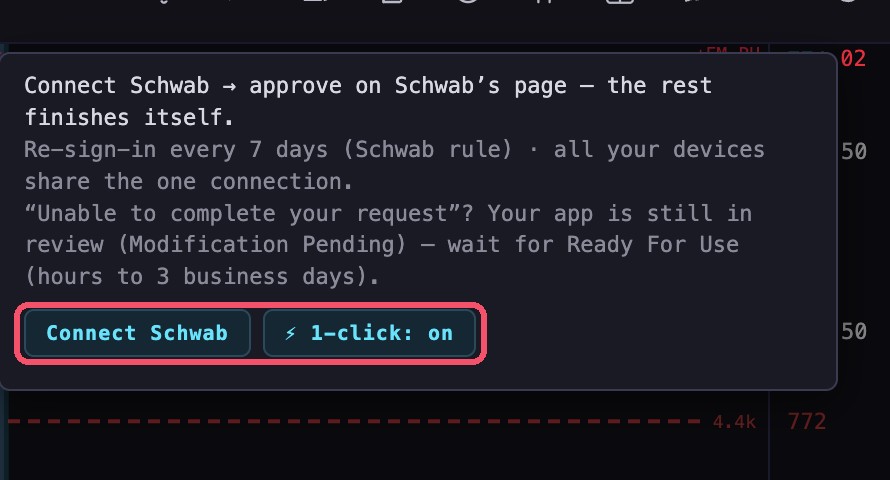
⚡ Recommended — 1-click reconnect (the end of the copy/paste sign-in): with the Callback URL above set to https://app.momox.io/schwab/callback, MomoX3 finishes the Schwab sign-in by itself — the weekly reconnect and every new device become two clicks: ⚡ 1-click → Enable once on the Connect Schwab banner, then Connect Schwab and approve on Schwab's page — the rest finishes itself. Creating your app fresh? Use that URL from the start — nothing extra to wait for. Changing the Callback URL on an app that already exists sends it back through Schwab review: status shows Modification Pending — sometimes just a few hours, up to 1–3 business days — and until it returns to Ready For Use, every sign-in fails with “We are unable to complete your request” (the paste method included). Nothing is broken while you wait: MomoX3 keeps running on real-time IEX + delayed full-tape data. Off-hours or a weekend is the best time to switch an existing app. This is what the wait looks like on your App Details page:Schwab App Details showing Status Modification Pending and the app.momox.io callback URL, both outlined in red
Using MomoX3 on more than one device? Schwab allows only one app with Market Data Production per developer account, and only one live connection per app — and creating a second app isn't possible (Schwab refuses it with a “max number of apps” error). The good news: MomoX3's cloud holds that one connection for you and shares it — your devices all stream Schwab at the same time; just sign in on each device (its own 7-day sign-in powers that device's options chains and ±EM data). The one-connection limit only bites if something outside app.momox.io uses the same Schwab app at the same time. This is a Schwab platform limit, not a MomoX3 one. How to tell you're connected: the feed pill is the truth — SCHWAB + green LIVE means this device is streaming the full tape right now. Seeing the Connect banner anyway just means this device's weekly sign-in is due for its own options chains and ±EM data — the stream stays live while you get to it.
5

Wait for “Ready For Use” — then wait a little more

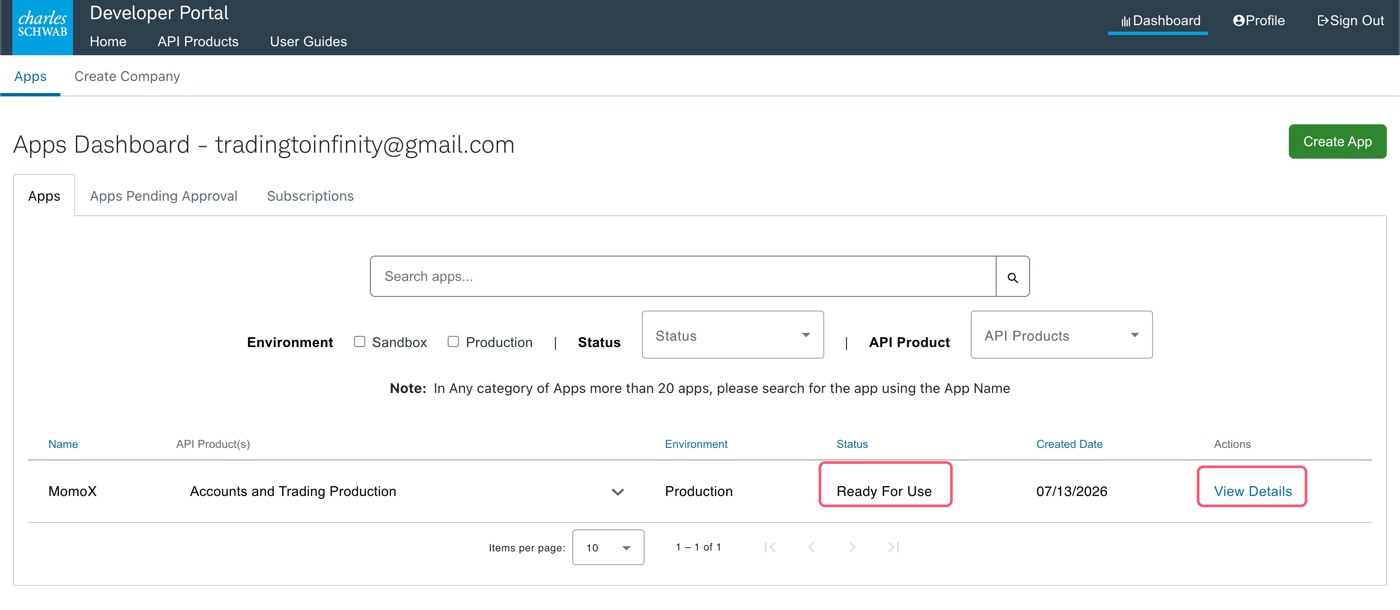
Schwab reviews new apps. Your app's status moves from Approved — Pending to Ready For Use — this can take a few hours to a couple of days.

⚠️ Even after the status says Ready For Use, the key often takes a few more hours to actually switch on at Schwab. If your sign-in fails on the same day you created the app, nothing is wrong — try again in a few hours or the next morning.
App details showing Ready For Use status, highlighted
6

Copy your App Key and Secret

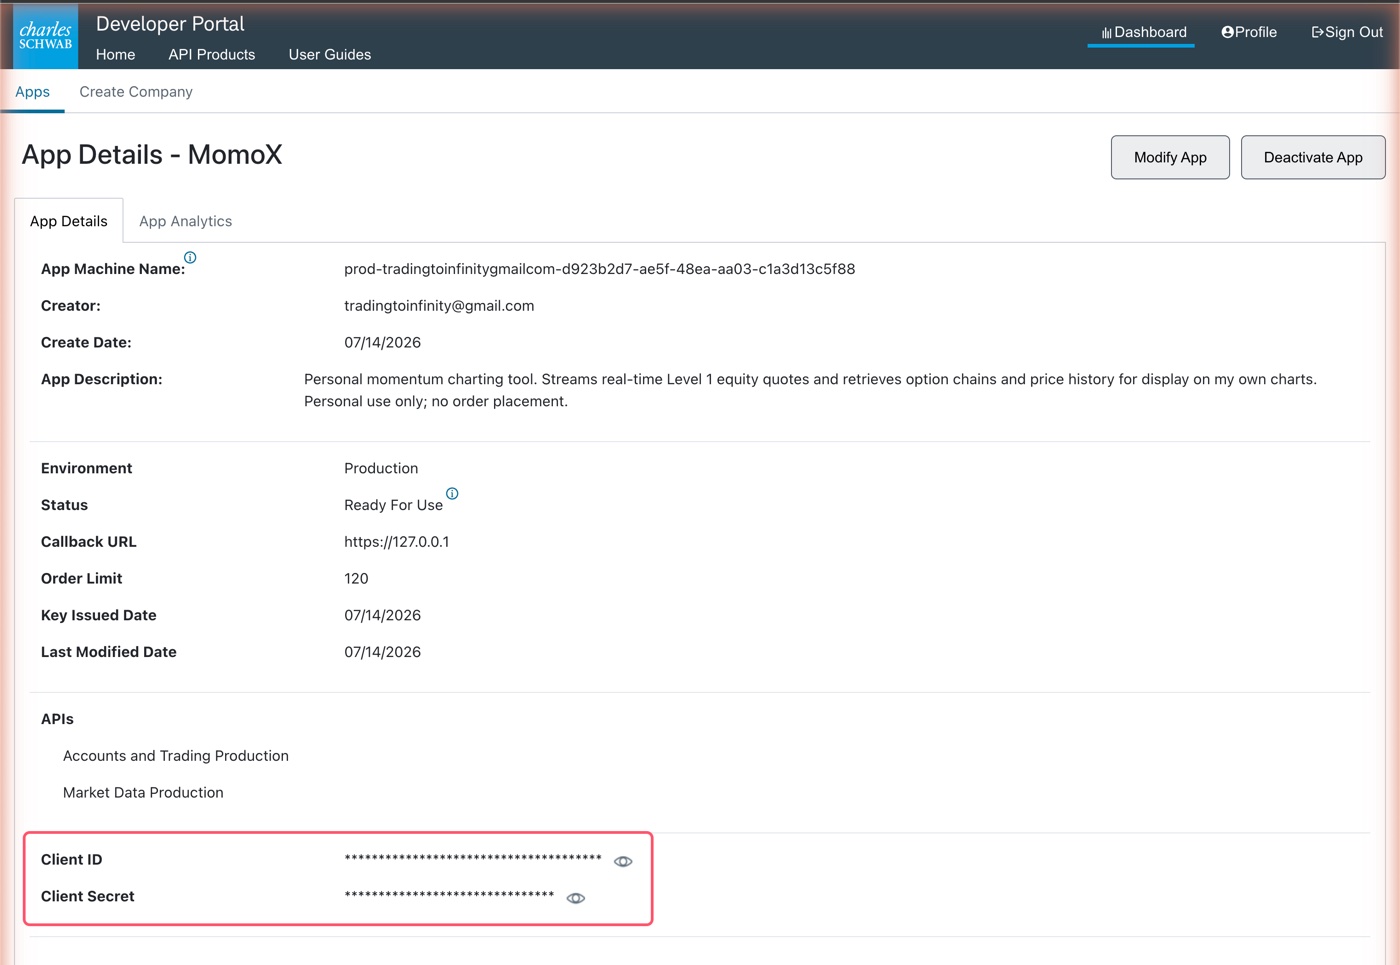
Open your app in the portal (View Details). At the bottom you'll find the App Key and Secret — copy each with the copy icon so you don't pick up stray spaces.

App details page with App Key and Secret locations highlighted
7

Add them in MomoX3

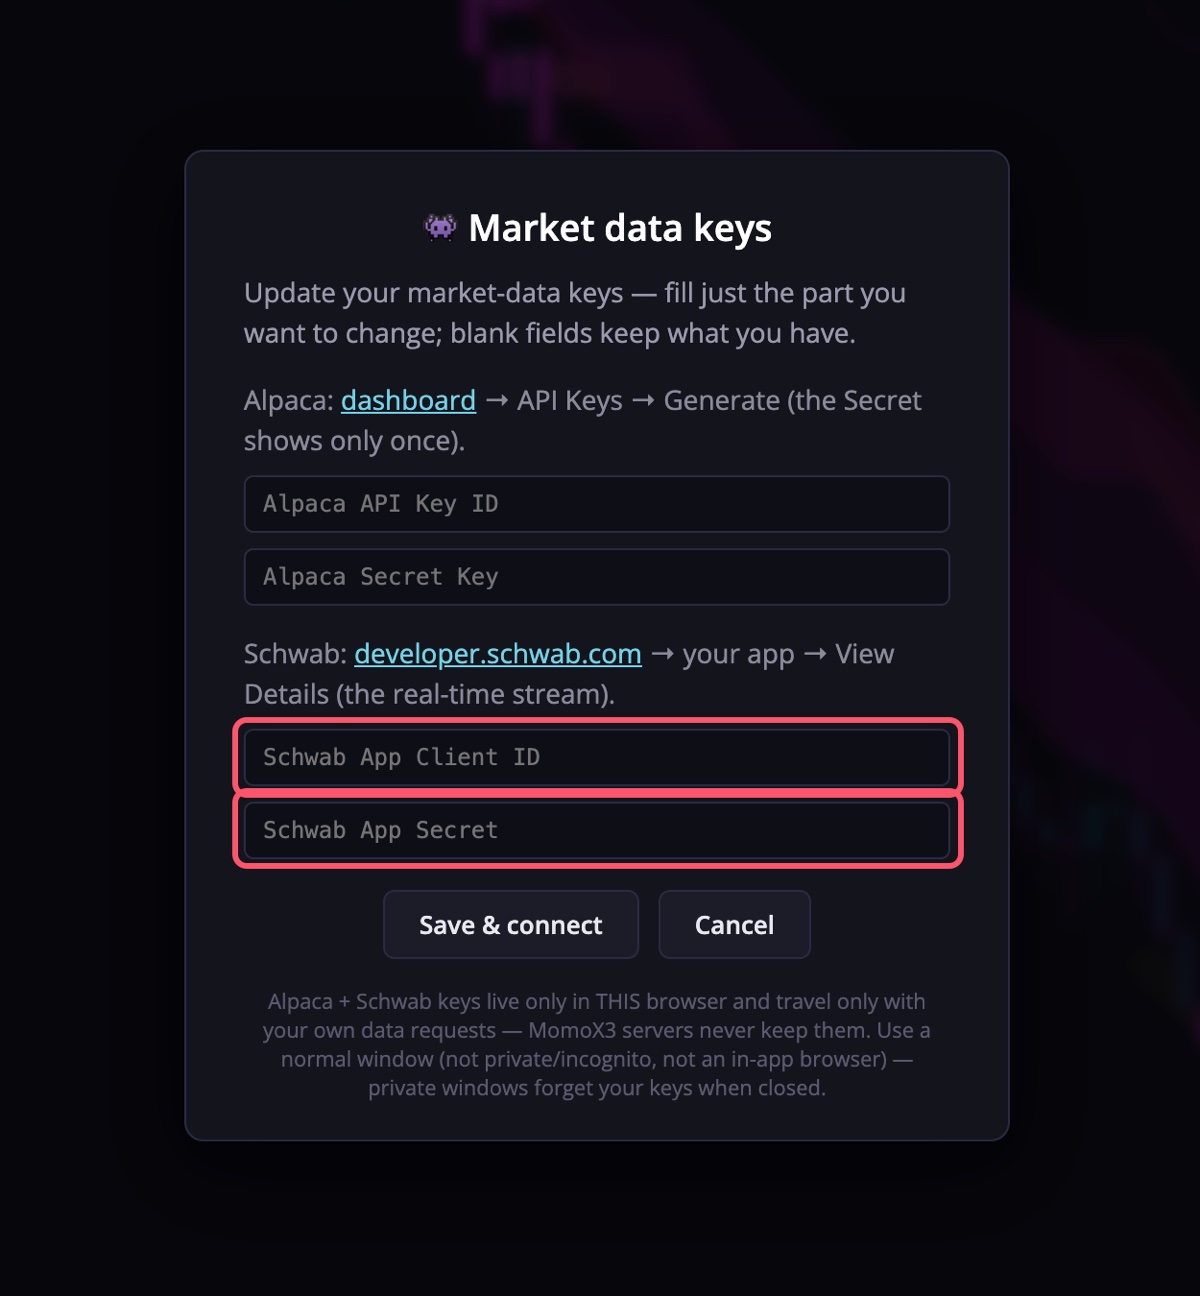
In app.momox.io, click the key button (top-right corner) and paste the App Key and Secret into the two Schwab fields, then Save & connect.

MomoX3 keys dialog, Schwab fields highlighted
8

Connect — approve on Schwab's page, the rest finishes itself

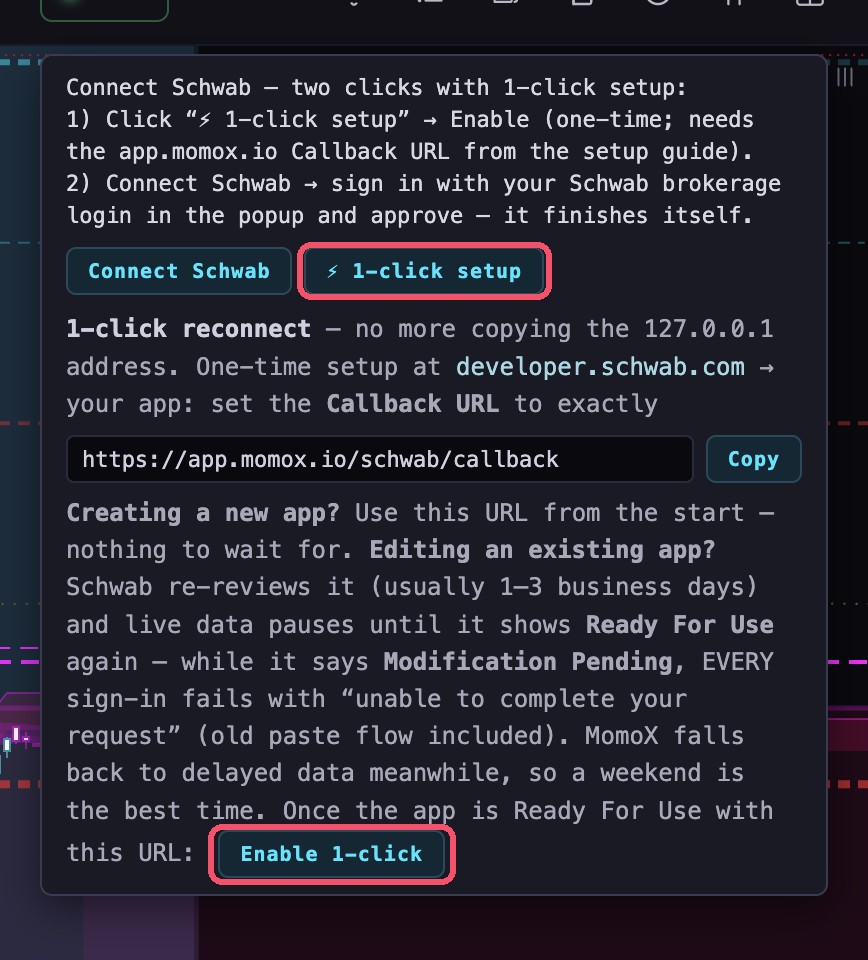
On the Connect Schwab banner: click ⚡ 1-click setup → Enable (one-time per device — it needs the app.momox.io Callback URL from step 4). Then click Connect Schwab: a popup opens — sign in with your normal Schwab brokerage login (not the developer one), pick your account, approve — and the popup closes itself.

Success: you'll see “Schwab connected — live stream ready” and the feed switches to Schwab automatically. That's the whole flow — every sign-in from now on is those same two clicks, and it's per device: your other devices share the live stream instantly and just do their own quick sign-in for options chains + ±EM. Schwab requires a fresh sign-in every 7 days — MomoX3 reminds you a day early. Steps 9–10 below are ONLY for apps still on the manual 127.0.0.1 callback.
The ⚡ 1-click setup panel: the callback URL with a Copy button, and the Enable 1-click button — both outlined in red MomoX3 Connect Schwab banner after enabling — Connect Schwab and the ⚡ 1-click: on button
9

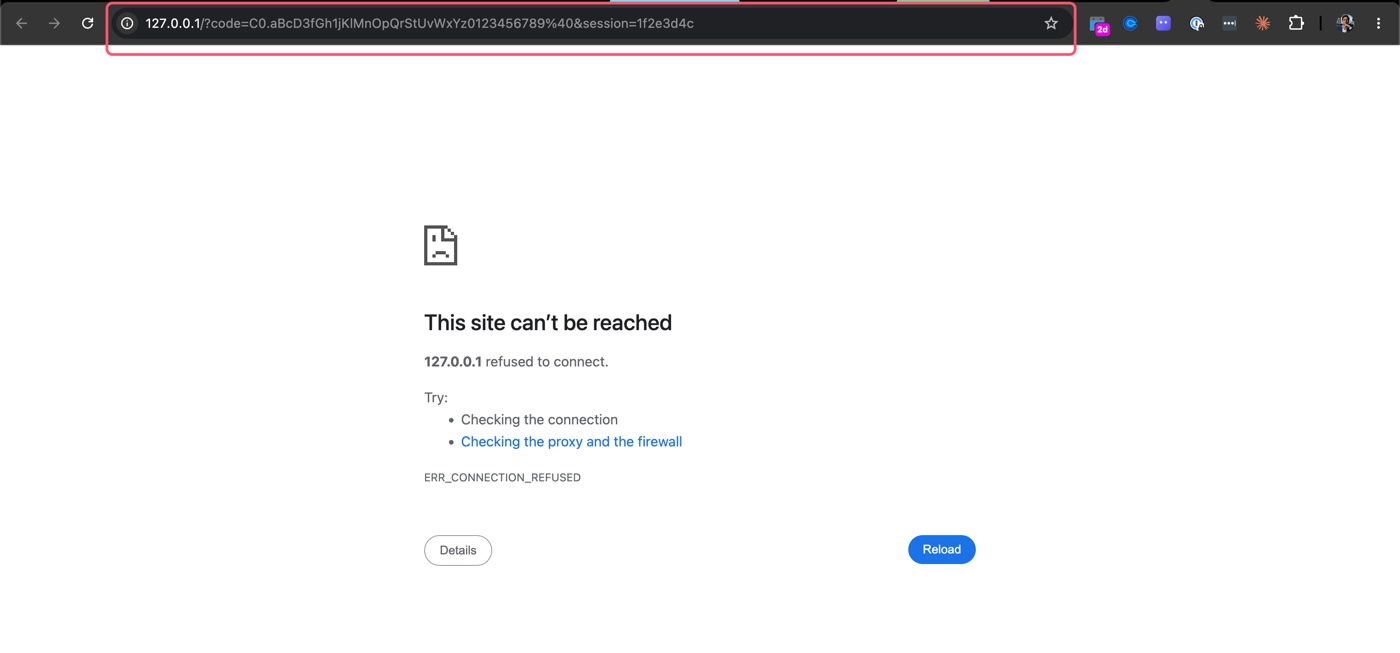
Manual method only: you'll land on a broken page — that's normal

(Skip 9–10 entirely if you use 1-click above.) With the manual https://127.0.0.1 callback, the browser lands on a page that can't load after you approve. It looks like an error. It is supposed to. The address bar of that broken page contains your login code.

The expected dead 127.0.0.1 page with the address bar highlighted
10

Manual method only: copy the whole address, paste, Finish — within ~30 seconds

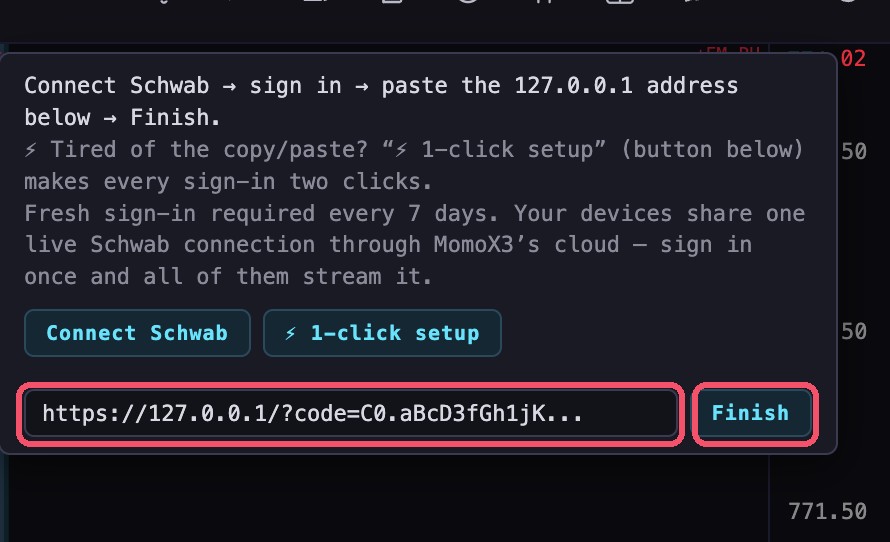
Click the address bar of the broken page, select the entire address, copy it, switch back to MomoX3, paste it into the banner's box and press Finish. Do this promptly — Schwab's codes expire in about 30 seconds. If it expires, just click Connect Schwab and go again. Success looks the same as step 8's.

Pasting the copied address into the MomoX3 banner
SETUP 3

Sign in to MomoX3

~1 minute

After you subscribe, your welcome email contains your sign-in. MomoX3 runs in any browser — laptop, desktop, tablet, phone — nothing to install.

1

Open your welcome email

Right after checkout you'll get a welcome email. Click its sign-in link (or use your license key at the door if that's what you received).

2

Set up your account at the door

At app.momox.io, choose Set up your account so your email address becomes your login — no key to keep track of.

3

One subscription = one person

Your access is personal. Sessions are limited per account, so use your own login on your own devices.